이미지 인코딩(Encoding)과 디코딩(Decoding) 과정 이해하기
보통 인코딩(Encoding)이라 하면, 문자를 컴퓨터가 이해할 수 있도록 바이너리 숫자 정보로 변환하는 것을 말한다.
이때 변환의 기준이 되는 것이 바로 ASCII, 유니코드 같은 형식들이다.
이렇게 데이터를 인코딩함으로써 다음 3 가지 측면에서 이점을 얻을 수 있다: ① 보안, ② 처리 속도 향상, ③ 저장 공간 절약.
이미지 데이터를 로드하는 방법에는 여러 가지가 있지만, 가장 자주 사용하게 되는 방식은 다음과 같이 file 또는 buffer로부터 이미지를 디코딩하는 방식이다.
PIL, cv2.imread, pyplot 등 다양한 라이브러리와 메서드를 비교해봤을 때 아래와 같은 방식이 가장 속도가 빠르고, 특히 cv2에서 한글로 된 파일명으로 인해 발생하는 오류를 방지할 수 있기 때문이다.
# 파일 경로로 가져오기
image_path = "이미지 경로"
img = np.fromfile(image_path, dtype=np.uint8)
img = cv2.imdecode(img, cv2.IMREAD_COLOR)

# buffer 가져오기
img = np.frombuffer(buffer, dtype=np.uint8)
img = cv2.imdecode(img, cv2.IMREAD_COLOR)
위 디코딩 과정과 함께 반대로 인코딩하는 과정까지
한 줄씩 뜯어보면서 array가 어떻게 변화하는지 살펴보고, 이미지 인코딩&디코딩 과정을 머릿속에 박제해보자.
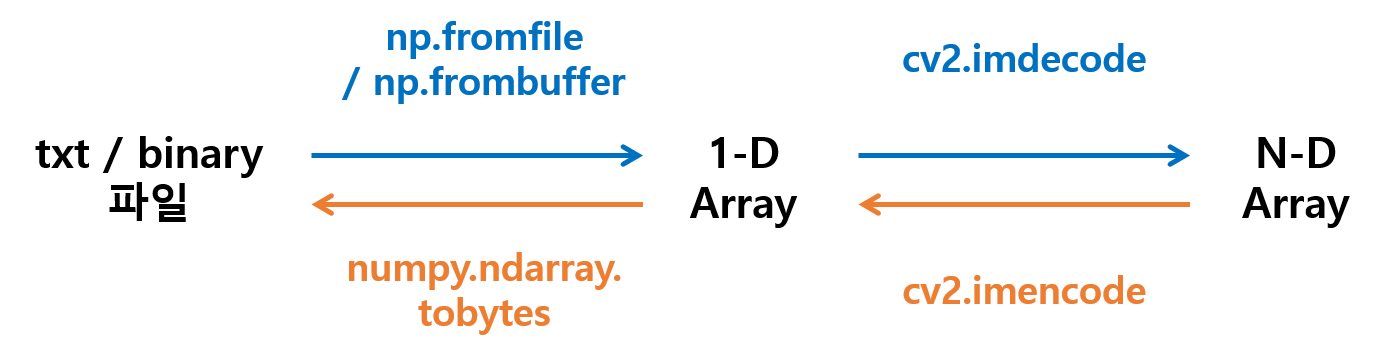
np.fromfile / np.frombuffer ↔ ndarray.tobytes
np.fromfile / np.frombuffer는 바이너리 데이터를 array로 변환해준다.
반대로 array를 다시 바이너리 데이터로 변환할 때에는 numpy.ndarray.tobytes를 사용할 수 있다.
확인을 위해 아래 코드를 실행해 보았다.
from_file = np.fromfile(img_path, dtype=np.uint8)
bytes1 = from_file.tobytes()
from_buffer = np.frombuffer(bytes1, dtype=np.uint8)
print(from_file)
print(from_file == from_buffer)
# 출력 결과
[255 216 255 ... 69 70 84]
[ True True True ... True True True]cv2.imdecode ↔ cv2.imencode
buffer 또는 file로부터 디코딩하면, flag에 따라 R, G, B의 3개 채널로 구성된 array를 얻을 수 있다.
반대로 이 값을 다시 인코딩하면 1개 dimension으로 이루어진 array가 된다.
확인을 위해 다음 코드를 실행해 보았다.
img_buffer = cv2.imdecode(from_buffer, cv2.IMREAD_COLOR)
# img_file = cv2.imdecode(from_file, cv2.IMREAD_COLOR)  # 위와 동일

encoded = cv2.imencode('.jpg', img_file, [cv2.IMWRITE_JPEG_QUALITY, 100])[1]
print(from_file == encoded)
# 출력 결과
False
읭?
분명 디코딩 이전의 array와 인코딩 이후 array를 비교하면 같아야 하는데, 다른 결과가 나왔다.
더 정확한 확인을 위해 encoded를 다시 디코딩하고 이미지를 출력해 보았다.

같아 보이지만 색감이 묘하게 다른 느낌이 든다. 육안으로 정확한 차이를 확인하기 어려운 정도이다.
얼마나 차이가 나는지 살펴보기 위해 인코딩 이전 디코딩 값과 이후 디코딩 값을 서로 비교해 보았다.
decoded = cv2.imdecode(encoded, cv2.IMREAD_COLOR)
print(img_file == decoded)

# 출력 결과
[[[ True False False]
  [ True False False]
  [ True False False]
  ...
  [ True  True  True]
  [ True  True  True]
  [ True  True  True]]

 [[ True  True  True]
  [False  True  True]
  [ True False False]
  ...
  [ True  True  True]
  [ True  True  True]
  [ True  True  True]]

 [[False  True  True]
  [False False False]
  [ True  True  True]
  ...
  [ True  True  True]
  [ True  True  True]
  [ True  True  True]]

 ...

 [[ True  True  True]
  [ True  True  True]
  [ True  True  True]
  ...
  [False  True False]
  [ True  True  True]
  [ True  True  True]]

 [[ True  True  True]
  [ True  True  True]
  [ True  True  True]
  ...
  [False  True False]
  [ True  True  True]
  [ True  True  True]]

 [[ True  True  True]
  [ True  True  True]
  [ True  True  True]
  ...
  [False  True False]
  [ True  True  True]
  [ True  True  True]]]
print((img_file == decoded).sum()) # 일치한 원소 개수
print(math.prod(img_file.shape)) # 전체 원소 개수
print(1 - ((img_file == decoded).sum() / math.prod(img_file.shape))) # 불일치하는 원소 비율
# 출력 결과
15358759
17978112
0.14569677839363782
약 15%의 차이가 있었다.
이와 같은 문제가 발생하는 이유를 찾아본 결과, 문제는 인코딩 방식 자체가 아니라, JPG 파일 형식의 특성에 있었다.
Why is cv2.imencode('jpg', ...) seemingly changing the color of an image?
I create and view a random image. Then, this image is encoded as a jpg file with opencv. However, after decoding this image the colors have been changed slightly. This behavior is not seen using pn...
stackoverflow.com
JPG is a lossy compression. It actually works by modifying colours in a way that should be "unoffensive" to the eye. PNG is a lossless compression, so you get exactly what to had after encode/decode.
재빨리 파일 형식을 PNG로 바꿔서 다시 실행해 보았다.
encoded = cv2.imencode('.png', img_file, [cv2.IMWRITE_PNG_COMPRESSION, 0])[1]

print(img_file == decoded)
print((img_file == decoded).sum())
print(math.prod(img_file.shape))
print(1 - ((img_file == decoded).sum() / math.prod(img_file.shape)))

# 출력 결과
[[[ True  True  True]
  [ True  True  True]
  [ True  True  True]
  ...
  [ True  True  True]
  [ True  True  True]
  [ True  True  True]]

 [[ True  True  True]
  [ True  True  True]
  [ True  True  True]
  ...
  [ True  True  True]
  [ True  True  True]
  [ True  True  True]]

 [[ True  True  True]
  [ True  True  True]
  [ True  True  True]
  ...
  [ True  True  True]
  [ True  True  True]
  [ True  True  True]]

 ...

 [[ True  True  True]
  [ True  True  True]
  [ True  True  True]
  ...
  [ True  True  True]
  [ True  True  True]
  [ True  True  True]]

 [[ True  True  True]
  [ True  True  True]
  [ True  True  True]
  ...
  [ True  True  True]
  [ True  True  True]
  [ True  True  True]]

 [[ True  True  True]
  [ True  True  True]
  [ True  True  True]
  ...
  [ True  True  True]
  [ True  True  True]
  [ True  True  True]]]

17978112
17978112
0.0
동일한 것이 확인되었다.
정리하면, 이미지 인코딩 및 디코딩 과정은 다음 그림과 같다.
이제 더 헷갈리거나, 오랜만에 보더라도 다시 찾아보지 않아도 될 것 같다!